Monday, February 15, 2016

Projects continue...

Tile and Doors - and not much more:)

President's Day Weekend meant we had three days. We'd been wanting to tile the laundry room, entry from garage and bathroom (most recent project). So earlier in the week we decided to dedicate the weekend to the tile project. 

I was pretty sure I wanted a dark slate looking tile. I went to Home Depot but found nothing dark. So, then over to Lowes. Why is it always 8:00 at night when I have a chance to do this kind of stuff? I did find a tile that would work perfect, 12x24 size that I wanted, AND it was on sale! 1.98 a square foot - but there was only one box. I waited around until an employee came by and I could inquire if there was any more tile - and hooray - they had a whole pallet! So I bought one tile to take home to show Jim and see what he thought, and another 'runner up'.  In the end, we went with the charcoal porcelain tile.

Friday night, when I got home from work, Jim had already pulled up the funky wooden tile stuff that was on the floor. I don't know how to explain what this stuff was, but it was probably before it's time when it was installed. And underneath, was some lovely linoleum that just screamed 1970s. Since it was glued to the cement, we decided to leave it and tile over the top of it. So Friday night, we started laying the pattern. I wanted a herringbone pattern but we were both a little skeptical since we've never done it before, but once it was laid out, we decided to go for it.

Friday night, working as a team, we got the laundry room floor tiled. Saturday we started on the entry and bathroom - which went slower since the space was smaller. It was kind of a challenge to get yourself in the bathroom and the tile, and the mortar and still have somewhere to squat to work.
The pictures below tell the story - and 'remaking the doors' turned into a bigger project - or at least it felt like it, than the tile project. We just couldn't put those ugly doors back up with our gorgeous tile.

It's Monday night - we are both tired and satisfied. 


The tan flooring is the wood tiles - not sure what it is - but is was dated. Love the mats all tossed in the bathroom - but that was when I remembered to take a before picture!

Here's the original linoleum - pretty great condition too!
Too bad I'm not into the retro look!

Entry way  - looking straight ahead to garage and to the right is the laundry room.

Close up of that 1970's linoleum


Began by laying out the pattern to see if we thought we could do it,
and if it was the look we wanted.
I wanted the herringbone since the laundry room is pretty long and narrow.
I wanted a pattern that would make it feel less like a runway.
At this point I was second guessing the tile - it looked like ugly cement.
I kept telling myself that the linoleum was throwing off my eye.

Beginning the tiling in the bathroom


Tile down in the laundry room

Tile down in the bathroom


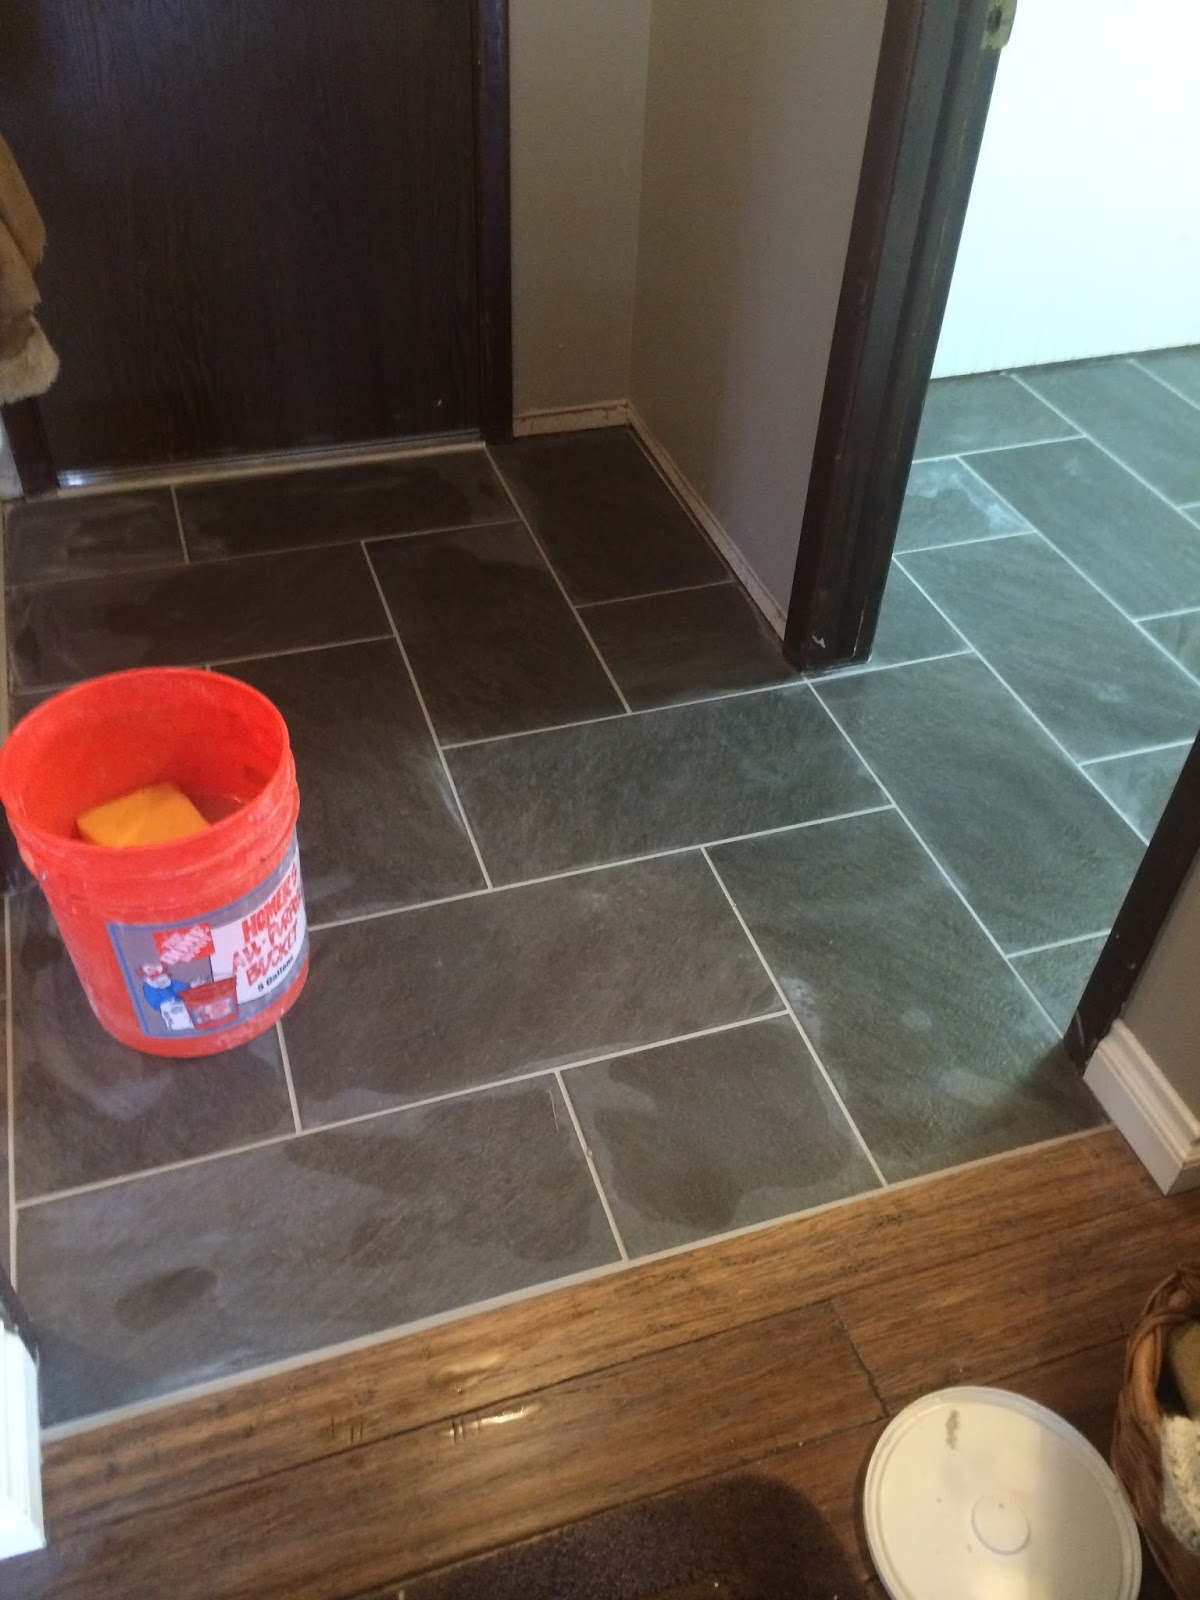
Tile down in the entryway.
Note the ugly brown door that goes to the garage and the brown trim on the door ways

Bathroom tile after grouting
Love it!!

Painted and installed baseboard

Used the wide baseboard that we've been using
all over the house. Love it!

Laundry room after grouting

Entry way after grouting
We must have rinsed, washed off the tile 6 to 8 times before it was clean from the grout


Note the dark wood trim around laundry room door - it's white now!
Can you say 5 coats with paint that has primer in it!
Sick of painting trim!

This is the door to the basement - (still needs to be transformed) - I forgot to take 'before' shots of the other doors - but they were just like this one.

Here it is again - I had started to paint the trim


This is the only picture I had of the door going to the garage before


The beginning of the transformation for the bathroom door.
Using the quarter inch playwood to make a panel door.

Best sport in the world - this was our romantic Valentine's Day!

I thought about buying new knobs, but at $16. for one door, I was headed for the spray paint.
So far, have sprayed 4 sets and still have lots of paint left in that $5.50 can.


Here's the panel door in the bathroom after it's been painted a gazillion times.
This ishot s from the corner of the bathroom.


There's the door knob after paint.
The walls look khaki colored in these photos, but they're actually gray. Huh.

Bathroom panel door.


This is the laundry room door (no knob on yet)
Used some left-over wainscot from the walls in the laundry room and then trimmed them.
Another gazillion coats of paint.

Laundry room door.


Door to garage.

Here it was to start.


Same design as laundry room door with wainscot and trim

Garage door straight ahead, laundry room door on right.
Bathroom door is straight across from the laundry room.

Garage door at night.
I can't get over how much brighter this area is now.


Laundry room after we put the appliances back in.
Love, love, love the tile.
Look - no runway!
You can see the panels on the door from this shot too.

Bathroom

I was surprised that the large tiles and herringbone pattern
really worked - even in such a small space.

We used the 12x24 tiles. 


Wednesday, February 3, 2016

Bathroom Update at Gordon House


Bathroom Updates

We haven't done much in the way of working on the house since this time last year. Guess that project was so big we needed some time off!  As tall people, we were both pretty frustrated with the super low vanities in this house and how outdated the bathrooms were. I've spent hours cruising Craigslist looking for replacement vanities and things we might need. It was time to start on the bathrooms and stop putting it off. Cold winter days seem optimal for getting these projects done. So here's where we are today.
Note: It is incredibly hard to get good pictures in bathrooms - let alone smaller ones!

Upstairs hallway bath:


This is what it looks like now!


This is what it looked like when we moved in.
I should have gotten a close up of the wallpaper, which was a huge pain to remove.
Also note the yellow counter.
What you can't see is just how low the counter is - mid-thigh height on us.


To get by before we could 'attack' this bathroom, I painted the vanity gray, painted the walls gray, replaced the blue fabric in the cupboard doors and tried white chalk paint over the yellow counter.
It all worked fine, but the super low vanity was a pain.


Here's what the floors look like now - marble!
You can see that we took the marble half way up the wall.


Here's the floor before. I'm not even sure what this flooring material is. It's in squares like tile, but clicks together and is some kind of board material. It's in all the bathrooms and laundry room.


Here's the builder grade mirror that is original. We wanted to keep a large mirror in here because it really helps make the room feel bright, and bigger - so Jim framed it out with some trim. We kept the original hanging pendant lights - I like them! I still need to spray paint the chain and fixtures on the lights, but will have to wait until it's warm enough outside to do some spray painting. What you can't see in the picture is that the marble goes all the way to the ceiling behind the mirror.


Here's the builder grade mirror as it was when we started.


I never could find a vanity that fit this space on Craigslist and buying a new vanity was not in the budget. So Jim framed in this space and we are going with the more modern look.
This is much higher than the old vanity and works so much better for us!


The vanity from before when the yellow counter was painted over with white chalk paint.


The little chair is so that Hadley can reach the sink!


New farm sink and faucet.

The new counter top - marble.


The original sink - yellow counter top painted over with chalk paint (chalk paint works for everything and did hold up to water!)


How the bathroom looks now.


This is how it started.


Next up...
The very small bathroom off the family room:


Before
Vanity very low - as they all are in the house.
We replaced this toilet when we first moved in for a low water flush one.
In this photo I had already removed the wallpaper.

Here's a scrap of wallpaper from this bathroom.


Here's what it looks like now.


This is the corner shower in this room - we didn't make any changes to it.
The tile in this shower is decent, but in order to replace the door we would have to tear the tile out - and that's not going to happen. Hmmm. What to do?


Yep - make an extra long shower curtain to hang over the front of it!


I thought this was a cool idea for a rod. It's probably my favorite feature in this room.

And it works perfect!

I wanted to make the shower curtain from blue ticking - but couldn't find it anywhere. I had a bit of it already, but only enough for an accent. So, made the shower curtain with drop cloth material - (I seem to use it for everything!) and some white sheet scraps. Cost of shower curtain= free!


Saw this idea on Pinterest and it worked great.

A rough board, before a slight sanding and stain. I wanted to retain the rough look.

After staining.

And here's what it looks like now.


So pulling out the vanity and the tile glued on the wall meant we had some major wall repair on our hands. Looks at all that glue, and chunks of drywall came out with it. 

Here's what it looks like now. We got the vanity , sink and fixtures (all came together) off of Craigslist. I'm starting to think we should call this the Craigslist house.


Demo begins

The floor underneath the vanity - circa 1970's. On top of it is that same flooring material as the upstairs bathroom.


So to solve the bad wall problem and try to give the room some texture and interest, we opted to put up fake shiplap. We went back and forth with using cedar fence boards (which was going to mean lots and lots of sanding) and ended up using plywood. Which thankfully, Home Depot ripped those super large boards into 6 inch boards. The nail gun was a life saver!


I was really liking it in the natural wood state!


As much as I like the natural wood look, my vision had white walls, so once the walls were up, I painted them white. Took three coats - and using a paint with primer added. The wood really soaked up the paint.


For a tiny bathroom, it has a great feel. Last thing on the list to check off for this space, is to take the old floor up and put down tile. That's going to mean pulling the toiler and vanity out - again!
We need it to warm up to do the tiling project.

Next up - the master bathroom.
It needs a new vanity, counter and sink...and oh yeah, that same weird floor will need to be replaced and then we can check bathrooms off the remodel list!